The first time you stand beneath the aurora, the cold doesn’t hit you. The wind doesn’t bother you. All you feel is the sky moving — the impossible greens twisting like smoke, pinks and purples rising through the stars. And then panic: you have one chance to capture this. You don’t want to ruin the moment fiddling with menus. You want settings you can trust.
After years of chasing aurora — and studying the work of other photographers who’ve nailed it — here’s the truth:
There is no single perfect setting for Northern Lights. The aurora can move slowly like a curtain or race across the sky like lightning. Your job is to make the camera react as fast as the aurora does, without drowning the image in noise.
Quick Answer
But here’s a reliable starting point — the settings that will get you a beautiful first result almost every time:
• Manual mode
• Aperture: f/1.4 to f/2.8 (use your widest)
• Shutter speed: 2–12 seconds (depends on motion)
• ISO: 800–3200 (raise as aurora gets faster)
• Lens: 14–24mm (wide enough to show scale)
• Focus: Manual, set to infinity (use Live View magnification)
• White balance: 3500K–4000K (keeps greens clean)
• Sturdy tripod + remote/2s timer (do not skip this)
Think of exposure like a three-way negotiation:
Fast aurora = shorter shutter = higher ISO
Dim aurora = longer shutter = careful star blur
Wide aperture = more light = edge softness risk
You’ll adjust constantly. Some nights you’ll shoot 2 seconds. Other nights, 20.
The goal of this guide isn’t just to give numbers — it’s to help you read the sky and choose the setting that preserves its motion and its intensity.
So now, let’s learn from real images — incredible successes, near misses, and everything in between — to show how Northern Lights photography actually works in the field.
How to Choose Shutter Speed for Northern Lights
| Aurora Movement | Visual Clue | Recommended Shutter | Result |
|---|---|---|---|
| Fast + dancing | Sharp edges, “ribbons” whipping quickly | 1–3 sec | Freezes detail in the structure |
| Moderate flow | Waves move steadily, not too frantic | 4–6 sec | Smooth beams, still decent structure |
| Slow + faint | Soft glow, barely changing | 8–12 sec | Brighter exposure, minimal motion blur |
| Very faint horizon glow | Only a weak green band visible | 12–20 sec (optional) | Helps reveal the aurora — stars begin to trail slightly |
How to Choose ISO for Northern Lights
(Adjust based on shutter + brightness)
| Aurora Brightness | What You’ll See | Recommended ISO | Why It Helps |
|---|---|---|---|
| Very bright | Lights reflecting on snow, clear shapes | ISO 800–1200 | Cleaner stars, low noise |
| Medium brightness | Good color, but needs lift | ISO 1600–2000 | Balance speed + brightness |
| Dim | Mostly dark sky with a weak tint | ISO 2500–3200 | Pulls detail out of shadows |
| Extremely faint | Barely visible to the eye | ISO 3200–5000+ | Noise increases — but it’s the only way |
The easy version:
Lower ISO if the aurora is bright — higher ISO if it’s weak or fast.
Quick Aurora Troubleshooting Cheat Sheet
| Problem in photo | What caused it | Fix |
|---|---|---|
| Aurora looks blurry or smeared | Shutter too long | Shorten shutter by 1–2 sec and raise ISO |
| Image too dark | Underexposed sky | Raise ISO one step (+400–800) |
| Stars look like short dashes | Earth rotation blur | Reduce shutter to under 10 sec at 14–20mm |
| Sky looks grainy | ISO too high | Try a wider aperture or slightly longer shutter |
A 10-second checklist before pressing the shutter
- Manual mode
- Aperture wide open (f/2.8 or faster if you have it)
- Start with ISO 1600, 4-second shutter
- Shoot → Review → Adjust using the table above
- Keep fingers off the camera → use 2s timer or remote
If in doubt: ISO 1600 — 4 seconds — f/2.8
That’s the safest “don’t panic” preset.
Understood — much lighter emphasis. Here’s the revised version with strong structure, minimal bolding, and no divider lines.
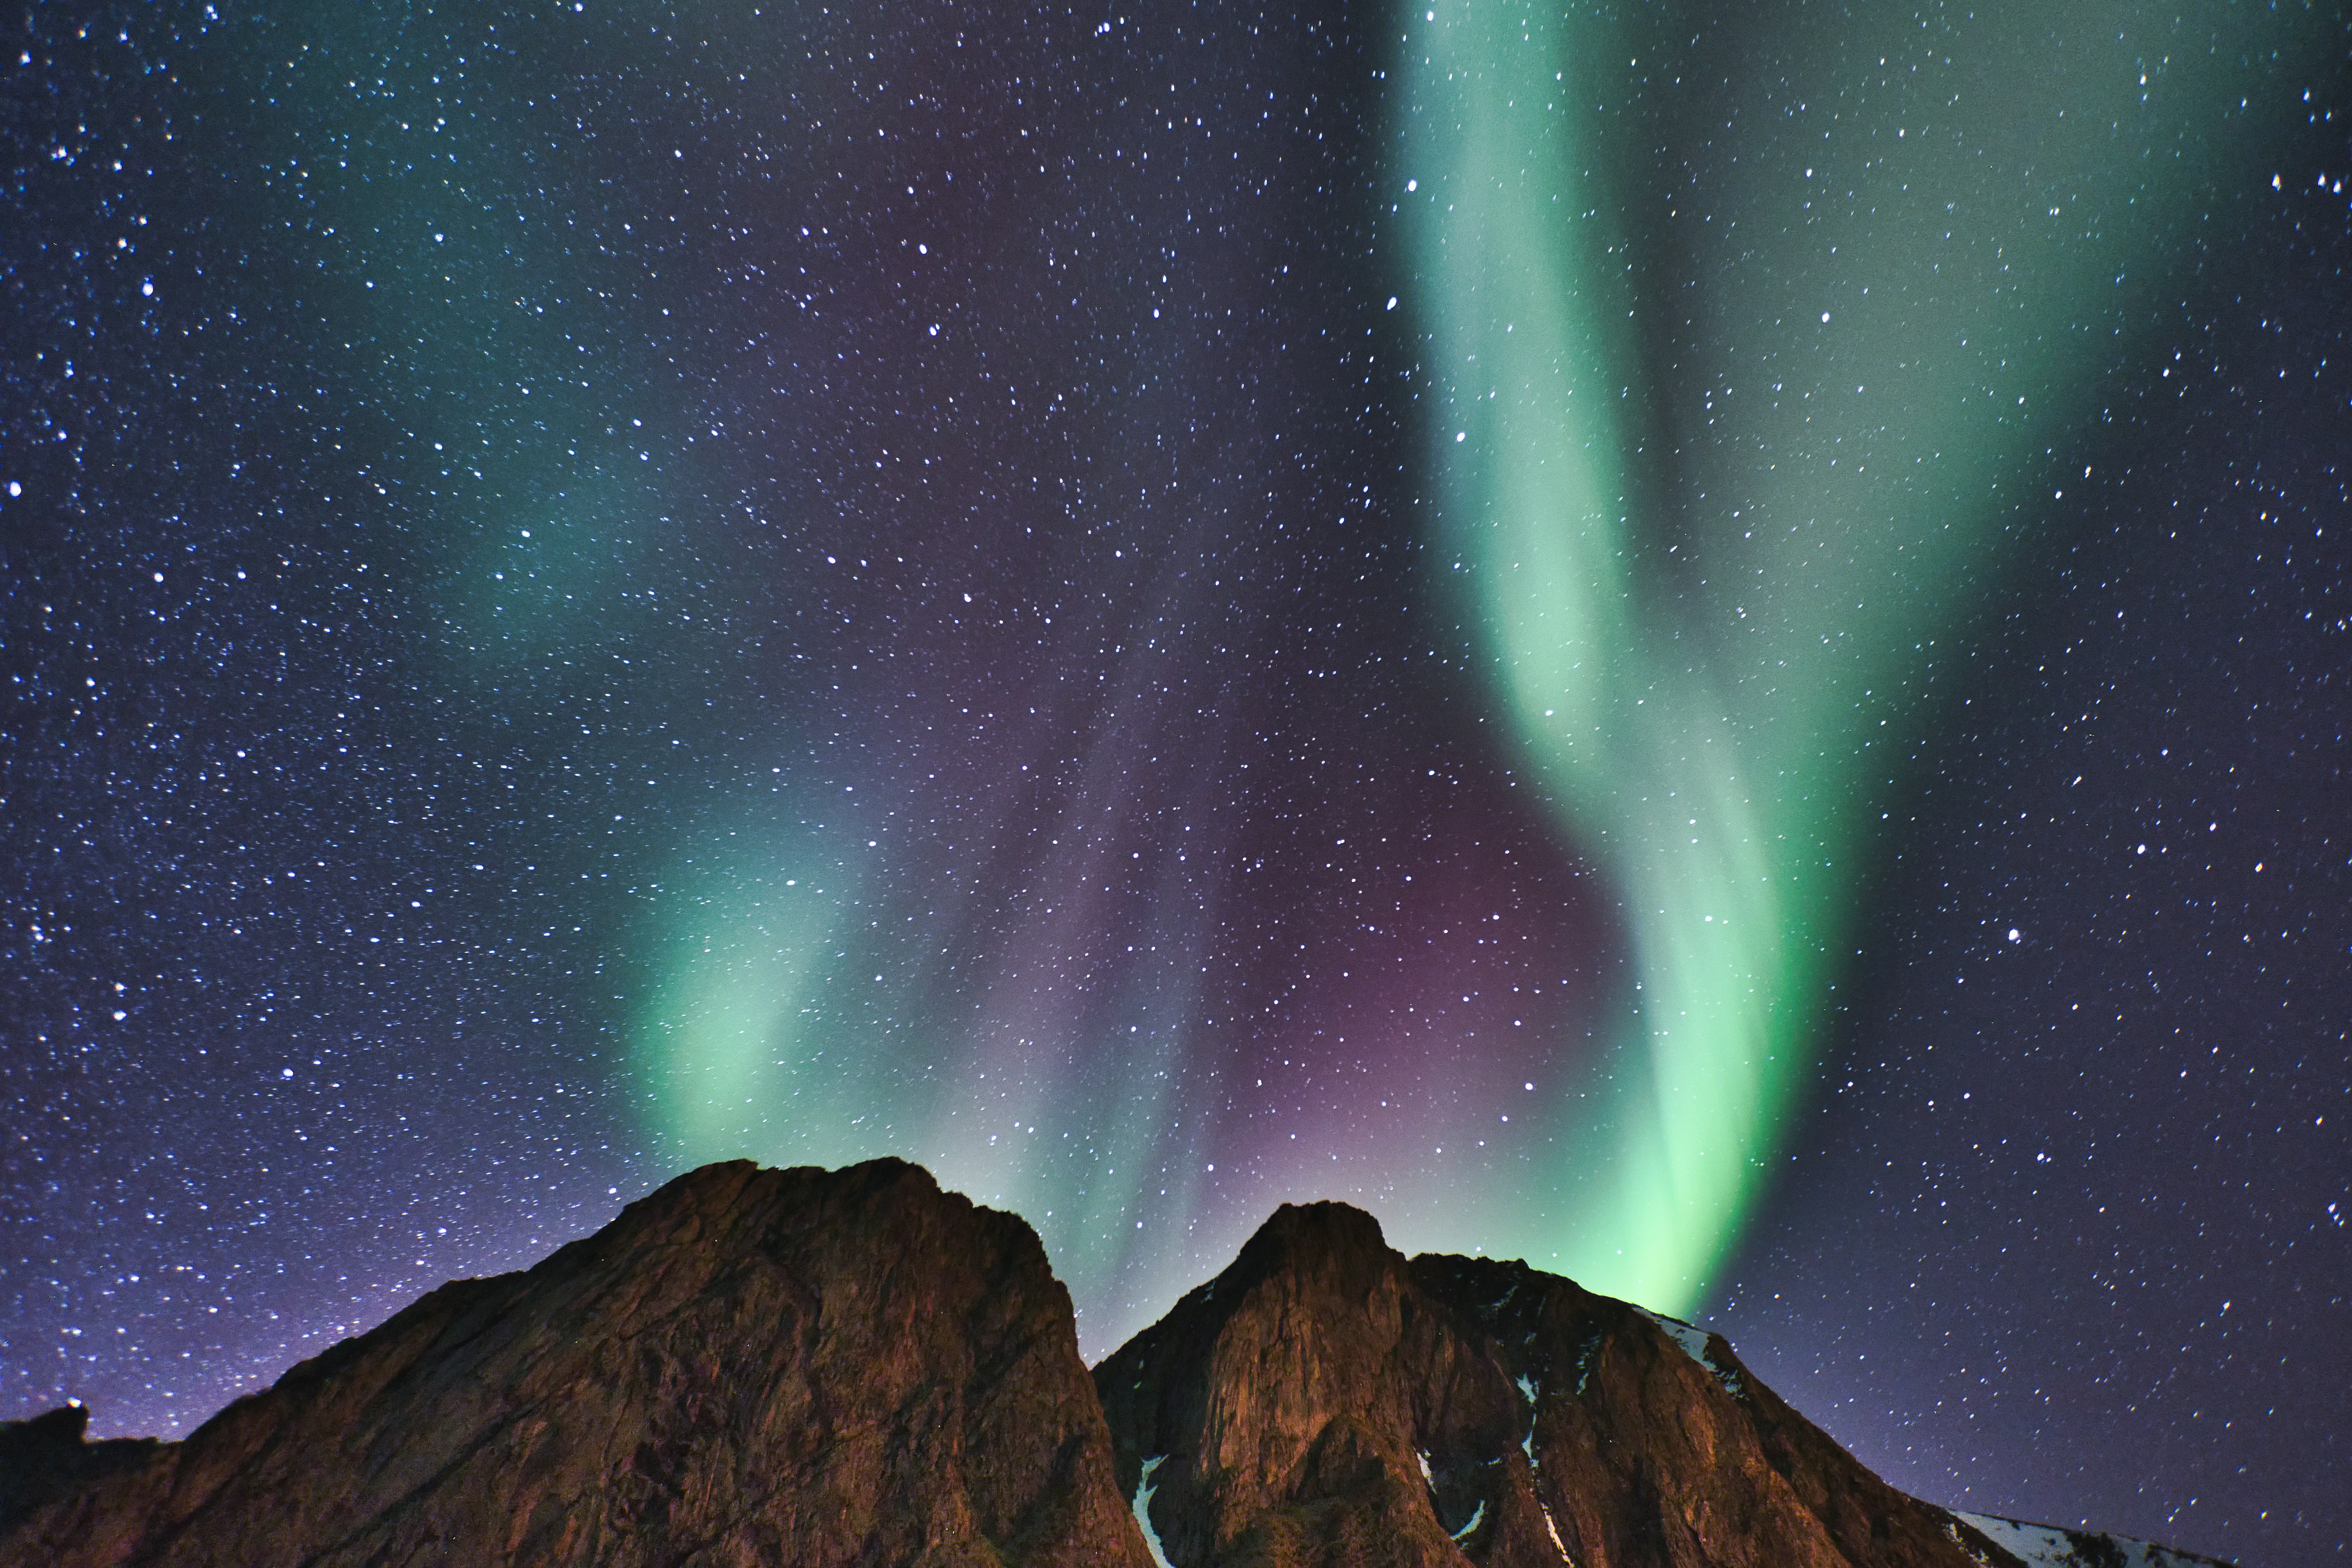
Case Study #1 — The Fjord Aurora

Canon + EF 24–70mm f/2.8L II USM
ISO 800 • f/2.8 • 8s • 24–70mm
Snow crunches beneath your boots while a gentle wave of green spreads across the fjord. The lights aren’t in a rush tonight. They move slowly, steadily, almost like they’re letting you practice. The photographer recognized that calm motion and chose a shutter speed that matches it instead of fighting it.
This is what I’d call a “slow-aurora setup” — long enough to brighten the scene and reveal the sky’s softness without letting motion smear the details too much.
What the camera settings prioritized
| Priority | Value |
|---|---|
| Brightness | Shutter (8s) + wide aperture (f/2.8) |
| Noise control | ISO limited to 800 |
| Motion rendering | Slight smoothing rather than crisp ribbons |
The balance leans toward clean exposure rather than texture in the fast-moving edges of the aurora. A reasonable choice for this moment.
What’s working well
• Exposure is well controlled — nothing blown out, nothing drowned
• ISO 800 keeps the file clean enough for large prints
• Stars still look like stars, not streaks
• The wide-open aperture captures the most light this lens offers
A beginner could copy this exact setup and confidently capture their first northern lights photo.
What could be improved
• If the aurora starts speeding up, fine structure may soften
• The image would benefit from a stronger foreground anchor
• A slightly warmer white balance (around 3500–3800K) could add depth to the greens
Small adjustments. Nothing fundamental is broken here.
When to copy this exact setup
Conditions where ISO 800 — 8s — f/2.8 works perfectly:
• Aurora brightness is medium to strong
• Movement is graceful and slow
• There’s good reflective terrain (water, ice, snow)
• You want to keep noise low for publication prints
This is the safest “don’t panic” exposure for a calm night in the Arctic.
What to change when conditions shift
| Situation | Adjustment |
|---|---|
| Lights suddenly move faster | Shorten shutter to 4–6s and raise ISO to 1200–1600 |
| Aurora fades | Keep shutter around 8–12s but push ISO to 1600–2000 |
| Stars begin to stretch | Drop shutter to 6s and ISO to 1600 |
It’s always a three-way negotiation: shutter vs. ISO vs. motion.
Gear tip for this lens
With a 24–70mm zoom:
• Favor the wide end (24mm) unless you have huge arcs overhead
• Always focus manually — use magnified live view on a bright star
• Turn off image stabilization on a tripod to avoid micro-movement blur
This lens is not the widest option, but it’s excellent for aurora with mountains or reflections in the frame.
Case Study #2 — The Purple Burst in the Tundra

Canon EOS R6 Mark II + EF 17–40mm f/4L USM
ISO 1600 • f/4 • 8s • 19mm
The aurora here isn’t creeping across the sky, it’s stretching upward. Those purple vertical beams are the giveaway. The lights have more punch, more structure, more speed than the fjord scene in Case Study #1. The photographer responds by pushing ISO to 1600 while keeping an 8-second shutter — a solid middle-ground exposure that balances motion and brightness.
f/4 is the lens’s limit, so the ISO has to do more of the heavy lifting.
What the camera settings prioritized
| Priority | Value |
|---|---|
| Motion detail | Shorter exposure avoided excess streaking |
| Brightness | ISO 1600 compensates for slower glass |
| Composition flexibility | 19mm provides a wide sweep of sky |
The exposure was driven by a need to keep structure intact while still revealing color variety from green into magenta.
What’s working well
• Aurora edges remain sharp enough to show movement
• ISO 1600 captures vibrant sky color without overwhelming noise
• 19mm widens the frame for a strong vertical composition
• 8-second shutter retains detail in star points
The photographer made smart compromises with a slower lens.
What could be improved
• At f/4, this setup is already light-starved — a faster lens would offer more control
• ISO 1600 is fine here, but darker nights could push this camera harder
• Foreground has little definition — a closer reference object would improve scale
Given the constraints of the lens, the image performs well.
When to copy this exact setup
ISO 1600 — 8s — f/4 is a good choice when:
• The aurora is energetic but not erratic
• You’re using a wide-angle lens with an f/4 max aperture
• Your goal is a crisp sense of motion in beams
• You have a mirrorless body that handles ISO gracefully
This is a solid baseline for anyone shooting aurora with Canon’s lightweight f/4 ultrawide zoom.
What to adjust if conditions change
| Situation | Adjustment |
|---|---|
| Lights suddenly speed up | Shift to 4–5s and raise ISO to 2500 |
| Scene becomes darker overall | Extend to 10–12s and ISO 2000–2500 |
| Magenta tones look muted | Warm white balance slightly to ~3800K |
Every parameter is dependent on how fast the aurora is breathing.
Gear tip for this lens
The EF 17–40mm f/4L is durable, but:
• It will always need higher ISO than an f/2.8 or f/1.8 lens
• Frame something close in the foreground at 17–20mm — it prevents empty-sky syndrome
• Expect to lift shadows in post; expose carefully to protect highlights
This lens rewards thoughtful composition: tundra trees, rock formations, a tent lit from within.
Case Study #3 — The Lapland Arc

Olympus E-M1 Mark II + 15mm
ISO 400 • long exposure (visually estimated ~10–15s) • wide aperture • 15mm
There’s a calmness to this one. The aurora forms a gentle arc stretched across the sky, not tearing through it. It’s the kind of display that gives you breathing room — and the photographer used that time. The exposure is long, the ISO is low, and the result is a quiet but very clean capture. On a night when the aurora isn’t a sprinter, you let the shutter open and invite the faint details in.
This is a technically disciplined approach: maximize image quality when the sky allows it.
What the camera settings prioritized
| Priority | Value |
|---|---|
| Clean shadows | Low ISO 400 |
| Brightness from time | Longer shutter |
| Stability | Wide-angle 15mm to minimize star trails |
The photographer trusted the long exposure rather than cranking gain — a smart choice when noise performance is limited by sensor size.
What’s working well
• Very low noise — strong file quality for editing later
• Smooth and dreamy aurora texture that suits the slow movement
• Wide composition gives the sky room to breathe
• Likely excellent star shape due to wide focal length
This photo shows patience behind the camera — always a good sign.
What could be improved
• Longer exposures like this can soften the structure if the aurora changes pace
• ISO 400 may be too conservative if the lights begin to brighten
• The midground could use a stronger silhouette to prevent a “flat horizon” effect
Still: the technical call matches the mood of the moment.
When to copy this exact setup
Low ISO + long shutter works when:
• The aurora is faint or moving slowly
• Foreground detail isn’t fast-moving and doesn’t need flash
• You want the cleanest tones possible for prints
• Sensor noise performance isn’t as strong as full-frame rivals
This is an ideal Micro Four Thirds baseline for calm aurora displays.
What to adjust if conditions change
| Situation | Adjustment |
|---|---|
| Aurora suddenly intensifies | Shorten to 6–8s and increase ISO to 800 |
| Aurora develops ribbons | Drop shutter to 3–4s for sharper detail |
| Foreground needs more presence | Add slight local light (headlamp, dim lantern) |
Every change in the sky should be answered with a change on the dial.
Gear tip for this system
Olympus stabilization is amazing handheld — but it must be off on a tripod.
Additionally:
• Try f/1.8 primes for dramatic improvements in flexibility
• A small MFT sensor benefits from more light — waste fewer stops
• Test infinity focus before the aurora appears
Preparation matters even more with smaller sensors.
Case Study #4 — Aurora in Motion Over Norway

Nikon D610 + 16–35mm f/4
ISO 3200 • f/4 • 3.4s • 19mm
This is a night when the aurora doesn’t sit still. The beams stretch upward in sharp, fast-moving columns. You can practically feel the rush of solar wind from the pace of the light. The photographer responded with a shorter shutter — 3.4 seconds — to freeze those shapes before they smeared into green clouds. High ISO becomes the price you pay for motion clarity.
It’s an exposure built for speed, not perfection.
What the camera settings prioritized
| Priority | Value |
|---|---|
| Aurora structure | Short 3.4s shutter |
| Brightness survival | High ISO 3200 |
| Coverage | 19mm captures the sky’s scale |
This is a “catch it before it moves” frame — sacrificing some noise performance to retain detail in the pillars.
What’s working well
• Crisp structure in the fastest-moving sections of light
• Strong visibility of magenta tips — always a good sign of proper exposure
• Stars remain sharp points thanks to limited shutter duration
• Wide focal length fits the drama into a single frame
The photographer read the sky correctly and matched its pace.
What could be improved
• ISO 3200 pushes noise — acceptable here, but risky in deep shadows
• f/4 again becomes the limiting factor — a faster lens would change everything
• Slight star stretching could appear at 3+ seconds depending on pixel pitch
This is one of those shots where the lens is holding back the camera.
When to copy this exact setup
Fast aurora demands:
• Shutter 1–4 seconds
• ISO 2000–3200
• Wide aperture (whatever your lens offers)
This approach favors motion detail first, all other concerns second.
What to adjust if conditions change
| Situation | Adjustment |
|---|---|
| Lights start slowing down | Extend shutter to 5–8s and lower ISO to ~2000 |
| Noise becomes distracting | Reduce ISO to ~2000 and accept slightly softer edges |
| Foreground becomes important | Raise exposure to 4–6s and compensate later in noise reduction |
Most photographers learn this rule the hard way:
Noise is easier to fix than motion blur.
Gear tip for this lens
Nikon’s 16–35mm f/4 is rugged and reliable, but:
• Plan around the f/4 limitation — ISO will climb fast
• Consider upgrading to a fast wide prime (20mm f/1.8 is ideal)
• Use lens correction profiles to reduce edge distortion on stars
If you shoot aurora often, faster glass is one of the best upgrades you can make.
Case Study #5 — The Rare Swiss Aurora

Nikon D850 + 24–70mm f/2.8
ISO 200 • f/3.2 • 20s • 24mm
This is the kind of night you never expect. Not in Switzerland. Not this far from the polar oval. The aurora is faint, but lightning could strike twice — or never again. So the photographer does what almost anyone would do: drag every photon possible into the camera. A 20-second exposure, low ISO, and a moderately wide aperture combine to reveal a sky the naked eye might have barely seen.
It’s a careful, patient approach for a delicate, rare show.
What the camera settings prioritized
| Priority | Value |
|---|---|
| Noise quality | ISO held to 200 |
| Brightness | 20-second shutter collects maximum light |
| Lens capability | f/3.2 allows acceptable sharpness across frame |
This is the opposite end of the spectrum from Norway’s fast pillars — slow, faint aurora requires time more than speed.
What’s working well
• Almost zero visible noise — ideal if prints are the goal
• Deep exposure reveals color variation the eye couldn’t distinguish
• Stars remain surprisingly defined for a 20-second shutter at 24mm
• The wide frame establishes landscape scale, grounding the aurora
The photographer made the right call to ensure the event wasn’t missed.
What could be improved
• If the aurora had suddenly accelerated, banding would smear quickly
• ISO 200 is safe but overly conservative — ISO 400–640 would offer flexibility
• f/3.2 is fine, but opening to f/2.8 would reduce shutter time and improve star shape
• A slightly shorter shutter would give a cleaner ceiling on star elongation
This is a case where fear of noise may have cost motion preservation… but the aurora stayed gentle, so the gamble worked.
When to copy this exact setup
Use long exposure + low ISO when:
• The aurora is faint
• You want the cleanest possible file
• You’re shooting with a full-frame body that handles low light gracefully
• You have a “once-in-a-decade” chance and cannot risk total underexposure
Better safe with a captured image than disciplined with nothing to show.
What to adjust if conditions change
| Situation | Adjustment |
|---|---|
| Aurora brightens | Shorten to 10–12s and raise ISO to 400 |
| Aurora speeds up | Snap to 4–6s and ISO 1600 |
| Foreground is too dark | Add light painting or bracket a second exposure |
A flexible mindset matters more than a rigid settings chart.
Gear tip for this setup
The 24–70mm f/2.8 is a great generalist lens:
• At the wide end (24mm), a 20-second exposure is just acceptable for stars
• For frequent night work, supplement with a fast wide-angle prime
• Bring a headlamp with a red mode — keeps your night vision intact while composing
When aurora shows up somewhere unexpected, you shoot with what you have — and this photographer did exactly that.
Final Northern Lights Photography FAQs
What is the best starting exposure for Northern Lights?
ISO 1600, 4 seconds, f/2.8 on a tripod. Adjust based on speed and brightness.
Why are my aurora photos blurry?
The lights moved faster than your shutter. Shorten exposure to 1–4 seconds.
Why do my stars look like dashes?
Exposure was too long for your focal length. Keep under 10 seconds at 14–20mm.
Is noise better than blur for aurora?
Noise can be fixed. Motion blur cannot. Favor freezing movement.
What white balance should I use?
Around 3500–4000K keeps green and magenta tones natural.
Do I need a full-frame camera?
No, but full-frame gives more dynamic range and cleaner high-ISO results.
What’s the best lens for Northern Lights?
A fast ultrawide: 14–20mm at f/1.4–f/2.8.
Should I shoot RAW?
Always. RAW rescues shadows and preserves aurora color transitions.
How do I focus in the dark?
Manual focus, use live view magnified on a bright star, then tape the ring.
Do I need a remote shutter?
A 2-second self-timer works fine to prevent tripod shake if you don’t have one.
Why does foreground matter so much?
It gives scale — aurora without an anchor becomes a screensaver.
What weather is best?
Clear skies, low humidity, cold air — less atmospheric interference.
How do I handle extreme cold?
Keep batteries in an inner pocket; swap quickly. Condensation happens inside, not outside.
Should I turn off image stabilization?
Yes, on a tripod. Stabilizers introduce micro-movement blur at long exposures.
How dark does it need to be?
Astronomical darkness. Avoid city glow — it eats the sky.
Leave a Reply